How to Master the Art of Carving a Walking Stick Head: Step-by-Step Guide
Carving a walking stick head can be a rewarding and creative endeavor. Whether you are a seasoned woodworker or a beginner looking for a new hobby, carving a walking stick head can result in a unique and personalized accessory. By following a few steps and using the right tools, you can transform a simple piece of wood into a stunning masterpiece.
In this article, we will provide you with a step-by-step guide on how to carve a walking stick head, from choosing a design to finishing touches. So, let’s get started and create a beautiful walking stick head that reflects your personality and artistic skills.
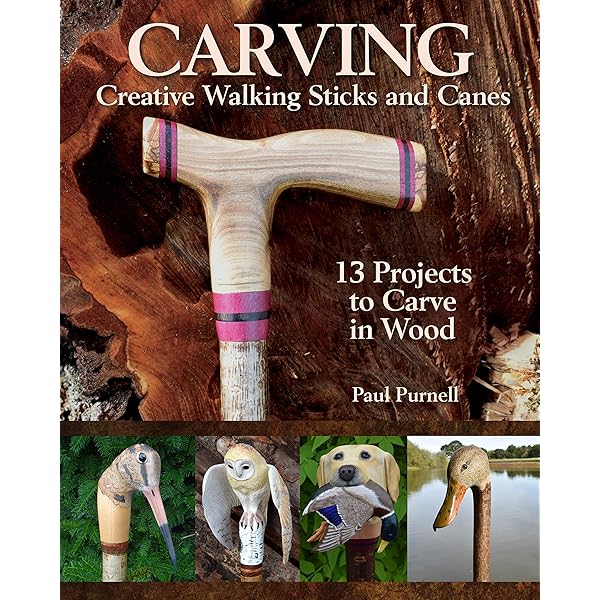
Credit: www.amazon.com
Choosing The Right Wood For Carving A Walking Stick Head
Choosing the right wood for carving a walking stick head involves considering several factors. First, you need to identify the types of wood that are ideal for carving. Each type of wood has its own characteristics that will affect the carving process and the final result.
Some popular choices include oak, maple, walnut, and birch. Oak is known for its strength and durability, while maple has a smooth grain that is easy to work with. Walnut offers a beautiful dark color and is ideal for intricate designs.
Birch, on the other hand, is a lightweight wood that is great for beginners. Consider the hardness, grain pattern, and level of detail you wish to achieve when selecting the wood for your walking stick head.
Preparing The Wood For Carving
Preparing the wood for carving involves removing bark and smoothing the surface. Start by carefully stripping away the bark using a knife or a specialized tool. Once the bark is removed, use sandpaper or a scraper to smooth the wood’s surface.
Ensuring the moisture content and seasoning of the wood is important to prevent cracking or warping during the carving process. Allow the wood to dry and stabilize for several weeks or months before starting the carving. To check the moisture content, use a moisture meter or simply let the wood air-dry until it feels dry to the touch.
Lastly, gather the necessary tools and equipment for the wood preparation, such as a carving knife, sandpaper, scrapers, and a moisture meter. Properly preparing the wood sets a solid foundation for the carving process.
Designing The Walking Stick Head
Designing the walking stick head involves exploring various design ideas and sketching them on the wood. It is essential to ensure symmetry and balance in the final design. Each stroke of the carving knife shapes the head to represent a unique and personal style.
With patience and attention to detail, the walking stick head can take on various forms, such as animal heads, mythical creatures, or intricate patterns. The design process requires creativity and precision, as every curve and line contributes to the overall aesthetic appeal.
Whether the intention is to create a functional or decorative walking stick, carving the head adds a personalized touch. So, gather your tools and let your imagination guide your hands as you transform a plain branch into a stunning walking stick head.
Step-By-Step Carving Process
Starting with rough shaping, you need to carve the basic outline of your walking stick head. Refining and adding details to the design will bring it to life. Remember to use essential carving techniques and follow safety tips to ensure a smooth carving process.
Practice patience and precision as you work on each section of the head, focusing on achieving the desired shape and texture. Take breaks when needed, as it can be a time-consuming task. With practice and skill, you’ll be able to create a walking stick head that is unique and reflects your personal style.
Enjoy the creative journey of carving!
Creating Expressive Facial Features
Carving a walking stick head involves creating expressive facial features, including the eyes, nose, and mouth. Adding texture and depth to these features is essential for capturing individuality and character. By carefully shaping and detailing each element, you can bring the walking stick to life.
Start by sketching out the desired facial expression before carefully carving it into the wood. Pay close attention to the placement and proportions of the features to ensure a realistic and lifelike appearance. Consider using different carving techniques and tools to add depth and texture, bringing out the unique personality of the walking stick head.
Remember to take your time and practice patience to achieve the desired results.
Enhancing The Walking Stick Head With Accessories
Carving a walking stick head is a craft that can be enhanced with various accessories. These additions, such as feathers or beads, can elevate the overall look and feel of the walking stick. When selecting materials for embellishments, it’s important to choose ones that complement the style and theme of the walking stick.
Whether it’s natural materials or artificial ones, make sure they are secure and won’t easily come off. Techniques like glue, wire wrapping, or drilling can be used for attaching accessories securely. By incorporating these additional elements and using the right techniques, you can create a stunning walking stick head that reflects your personal style and creativity.
Sanding And Finishing Techniques
Sanding is a crucial step in carving a walking stick head as it ensures a smooth and polished finish. By selecting the appropriate grit sandpaper, you can achieve the desired level of smoothness. Starting with a coarse grit, such as 80 or 120, will help to remove any rough surfaces or imperfections.
As you progress, gradually move to finer grits, such as 220 or 320, to refine the surface and create a satin-like finish. This process not only improves the aesthetic appeal but also prepares the wood for the application of finishes.
Applying a finishing touch, such as varnish or oil, enhances the beauty and durability of the walking stick head. Remember to follow the manufacturer’s instructions and allow sufficient drying time between coats for optimal results.
Handling The Walking Stick Head With Care
Handling the walking stick head with care is essential for maintaining the wood’s quality. Protecting the carving from environmental factors is crucial to prevent deterioration over time. When not in use, it is important to store the walking stick head properly to avoid exposure to moisture or extreme temperatures.
Regular cleaning techniques should be employed to remove any dirt or dust that may accumulate. By gently wiping the surface with a soft cloth and avoiding the use of harsh chemicals, you can preserve the integrity of the wood. Taking these steps will ensure that your walking stick head remains in good condition for years to come.
Displaying And Using The Finished Walking Stick Head
Carving a walking stick head involves several steps to achieve the desired result. Once the carving is complete, you need to consider how you will display and use the finished head. There are various mounting options available that allow you to showcase your creation, such as using a wall mount or a display stand.
It’s important to ensure that the head is securely attached to the walking stick for stability and safety purposes. You can use epoxy glue or screws to firmly fix the head to the stick. Once the head is securely mounted, you can start using the walking stick.
Make sure to hold it with a firm grip and use it in a comfortable and controlled manner to provide support while walking. With the right techniques, you can enjoy the beauty and functionality of your hand-carved walking stick head.
Showcasing Your Carving Skills
Carving a walking stick head is a fantastic way to showcase your carving skills. Participate in carving competitions or exhibitions, where you can share your masterpiece with others. Explore online communities and forums to connect with fellow carvers, exchanging ideas and learning new techniques.
These platforms provide opportunities to display your work and receive feedback from a supportive community. By participating in events and engaging with other carvers, you can expand your network and gain exposure for your craft. So, grab your tools and start carving, because the world is waiting to see your incredible creations!
Frequently Asked Questions On How Do I Carve A Walking Stick Head?
How Do I Carve A Walking Stick Head?
To carve a walking stick head, start by selecting a suitable piece of wood and sketching your design on it. Use carving tools to carefully remove the excess wood, shaping the head as desired. Refine the details with smaller tools and finish with sandpaper for a smooth surface.
Conclusion
In a nutshell, carving a walking stick head can be a rewarding and creative experience for anyone interested in woodcraft. By following these step-by-step guidelines, you can transform an ordinary walking stick into a unique piece of art. Begin by selecting the right wood and planning your design.
Take your time and exercise caution while carving, using the right tools and techniques. Remember to include essential features such as eyes, nose, and mouth to bring your walking stick head to life. Embrace your creativity and experiment with different designs and styles.
Finally, don’t forget to protect your finished piece with a suitable finish or sealant. With practice and dedication, you can master the art of carving walking stick heads and create beautiful keepsakes that showcase your skills and passion for woodworking.
So go ahead, dive into this exciting craft, and let your imagination soar!

Leave A Comment